Bay Roof
A bay roof is a three sided roof framed against a vertical wall of a building,
usually covering a projection from the building such as a bay window or breakfast nook.
A projection with four or more angled faces is a bow and cannot be calculated with Easy Rafters.
Framing a bay roof can be very frustrating,
often times even an experienced roof framer will resort to "trial and error"
cutting and fitting of the pieces required for a bay roof.
Sure signs of this are fascia boards that aren't level or taper from one end to the other,
soffits that vary in width, or unequal slopes for the three sides of the roof.
Easy Rafters greatly simplifies this task by calculating the rafters needed to
frame a bay roof with equal slopes for all sides, level fascias, and consistent soffits.
To Calculate a Bay Roof
Select Bay Window Roof from the dropdown list or select the Bay Roof button on the toolbar to calculate a bay roof.
The preview window displays a plan view and elevation view of the bay roof that reflect the current bay dimensions.
Design Tab
Slope
Enter or select the slope of the bay common rafter.
Projection
Enter the distance that the bay sticks out or projects from the wall that it's built against.
This dimension is equivalent to the run of the bay common rafter.
Width
Enter the width of the bay at its widest point.
The width at the face of the bay will be calculated automatically based on this width and the angle of the bay.
Bay Angle
Enter the angle of the bay. Bay Angle is the angle that the side walls of the bay slant out from the wall the bay is built against.
Select 30, 45, 60 or 90 degrees from the dropdown list or enter any positive number of degrees from 1 to 90 directly in the input field.
Note: Partial hip roofs are common over porches, entryways, etc.
They can be easily calculated as a 90 degree bay roof.
Overhang
Enter the horizontal overhang of the bay roof common rafter including the fascia board.
Heel Height/Seat Cut
Accept the default common rafter heel height and seat cut dimensions or override the defaults
by locking one or the other and entering a new value.
Bay hip and ledger rafters must be dropped slightly so that the edges of the rafters
don't interfere with the roof sheathing.
Easy Rafters will automatically calculate the correct amount of drop and adjust the heel height of the hip and ledger rafters accordingly.
Hip Correction
This option is disabled for Bay Roofs.
Hip and ledger rafters will be always be dropped rather than backed.
Lumber Sizes
Enter or select the lumber sizes for the common, hip and ledger rafters and the fascia boards.
Fascia Type
This option is disabled for Bay Roofs. All rafters will have plumb cut tails.
Drawing Tabs
Common
The Common tab displays a dimensioned side view of the Bay Roof common rafter.
Hip
The Hip tab displays a dimensioned side view of the Bay Roof hip rafter
and a top view of the hip rafter showing the measuring line and angles for the peak and tail cheeck cuts.
Side Ledger
The Side Ledger tab displays a dimensioned side view of the side ledger rafter
and a top view of the side ledger rafter showing the measuring line and the angles for the tail cheek cuts.
Center Ledger
The Center Ledger tab displays a dimensioned side view of the center ledger.
It is possible to design a bay where no center ledger is required
because the side ledger rafters meet in the center to form a peak.
Jacks
The Jacks tab displays a plan view of the bay roof showing the cheek cut angles
of the hip jack rafters and ledger jack rafters.
Sheathing
The Sheathing tab displays a flattened plan view of the bay roof
showing the dimensions and angles necessary to calculate and cut sheathing
for all sides of the bay roof.
Assembling a Bay Roof

Begin by locating and attaching the center ledger board to the wall of the building that the bay is built against.
The Bay Center Ledger drawing shows the vertical distance from the top of the wall plate to the top of the center ledger.
Use that measurement to attach the center ledger at the correct height above the wall plates making sure it is level and centered in the bay opening.
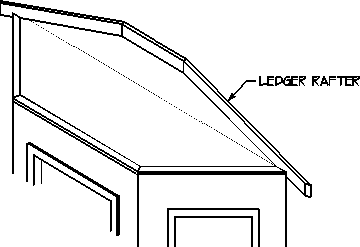
Attach the left and right ledger rafters next.
The ledger rafters have square top cuts that frame to meet the square cuts at either end of the center ledger.
The tops of the ledger rafters should be flush with the top of the center ledger.
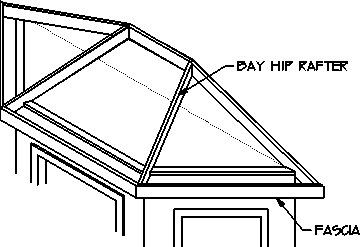
Install the hip rafters next with their single beveled tops centered on the joints where the side ledgers meet the center ledger and with their top edges flush to the top edges of the ledger boards.
The seat cuts of the hip rafters should be centered over the joints between the outer wall and the angled walls of the bay.
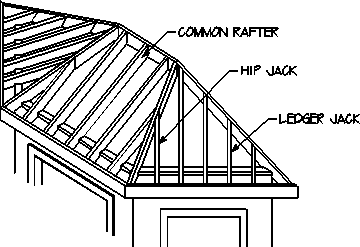
Finally, determine the number of common rafters required and attach them to the center ledger at the top and to the outer wall plate at the bottom.